My top 3 Caker Gifts this Christmas

free-holiday-season-calendar-blog-post-847x360

I cant’ believe its over a year since I wrote my last blog post!! That time has literally ran away from me in a blink of an eye and its all down to you, my clients who have kept me so busy this year with cake orders. I couldn’t be happier with how 2017 has gone for me and JensCoutureCakes and I’m so excited to see what 2018 brings. I also can’t believe its only 8 more sleeps until CHRISTMAS!!!!!!!! It’s my favourite time of year and also usually my busiest time of year with chocolate biscuit puddings, fruit cakes, etc., but as I said on my Snapchat the other day (if you don’t already follow me my snapchat user name is jenscouturecake, come say hi) this year I’ve decided to take a break from all the madness and spend more time with my little family. With that in mind, its Christmas time which also means buying gifts for your nearest and dearest and I’ve been asked a lot lately what would I recommend as gifts for women who love to bake and love all things cake. So, it got me thinking, which led me to googling and I’ve found some last minute gifts for the caker in your life that will be here just in time for Xmas.

  1. The Kenwood Multitone Mixer and Food Processor

I actually cant believe the price of this! Holy Sh*t its such a bargain with the 2in1 mixer and food processor everyone could use one of these in their kitchen. At the amazing price of only €195 (was €325) its a steal! The Kenwood is a favourite among all cakers for being one of the best and most durable mixers on the market. A friend of mine has had one on her family for over 20 years with there never being any problems with it. So its safe to say its a cakers Designer piece as an Investment. You can get yours online from Debenhams here.


kenwood multitone

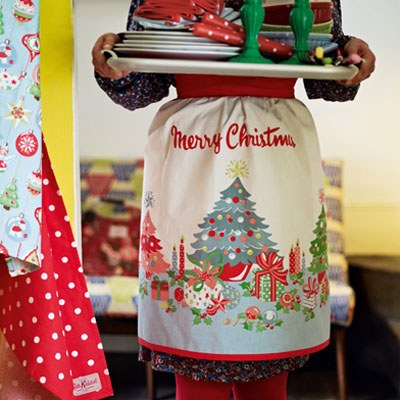
2) Cath Kidston Christmas Apron

Cath Kidston is a firm favourite among cakers for her beautiful designs festive and floral you’ll be sure to find something for everyone. Of course with it being the time of year a Christmas apron would seem appropriate for the Christmas seasonal baker but for the all year round cakers like myself maybe a more neutral design would be better suited. However, tis the season and all that so here is a beautiful Christmas apron I’ve found designed by the one and only Cath herself. They can be found in Kildare Village, Littlewoods and of course Cath’s website itself which you can click on here. Lots of them are up to half price in the Sale at the moment so even if its not a gift for someone else, whats the harm in buying one for yourself?!?!?!!?

cath-kidston-christmas-apron

3) Mary Berry Baking Bible Recipe Book

Every baker needs a good recipe book starting off and who better to start with than Mary Berry herself! Being the star baker that she is, Mary is part of The Great British Bake off, a highly respected British baker with over 75 cookery books in her career so far and her book The Baking Bible released in 2009 is perfect for bakers anew and also us more experienced cakers. A perfect gift for the star baker in your life for sure!! You can find them in any Eason’s store for just €36.40 or buy online here.

s-l1000

I hope this gave you some ideas worth looking at and helps you in your search for a gift for the baker/caker in your life!

For now, I’m off to bed to watch some Netflix and chill before a hectic week ahead of Christmas shopping and catching up on housework- the joys!!!

Chat soon xx

Jen ♥

Nima Brush Birthday Bash

nima-brushes-14

I was absolutely thrilled when the lovely Niamh, director and owner of Nima Brush asked me to make the novelty cupcakes for their 4th birthday bash this year. I have made cupcakes for Niamh before and didn’t get to meet her so I was super excited to finally get to meet her in person. She is such a lovely girl and what a #GIRLBOSS she is!!!


J

The event was taking place in The Bond Nightclub on Harcourt St., under Dicey’s. Jennie (one of Niamh’s team) got in touch and told me they were having an exclusive birthday party,  which was going to be a Masquerade theme, (as it was very close to Halloween what better theme to go with) and she asked me to come up with some designs to suit their theme. I decided what better to do than to incorporate the signature Nima Colour for the masks and add some glitz and glam to them to decorate.

nima-brushes

On arrival, there was unlimited glasses of Prosecco for everyone, along with lots of yummy treats in sweet jars, and of course the cupcakes. Niamh also had cool party neon glasses and bracelets for the guests. We set up the cupcakes on her beautiful Nima stand and also placed them on tables around the venue for all the guests.

nima-brushes-11

There was also an opportunity for all the guests to purchase the fabulous Nima brushes on the night which were displayed on the Nima table. Here is a close up of them…Aren’t they gorgeous?!?!?!?

nima-brushes-14

Needless to say, I was thrilled to get to meet Niamh and her wonderful team. They’re all such lovely girls and can tell they love Niamh and of course Nima. The night was a huge success with many a sore head the next day I’m sure. I was so overwhelmed when Niamh gifted me with a range her amazing brushes which I cannot wait to try!!! Have a look at these beauties……..

nima-brushes-18

Best of all I cannot wait to make Niamh’s wedding cake next year. She is so sweet and her wedding is going to be fabulous. Niamh thankyou for choosing JensCoutureCakes and I cannot wait to work with you on your wedding and future events ♥♥♥

Hope you guys enjoyed the read and if you were at the event I hope you had a ball as did I.

Jen ♥ xx


My Top 5 Gifts For A Caker

Can you believe its only 87 more days until CHRISTMAS!!!!!!!! It’s my favourite time of year and also my busiest time of year with chocolate biscuit puddings, fruit cakes, etc and I am so excited. Today I was asked by my younger sister what I would like for Christmas (she’s crazy, already on the prowl for gifts) and it got me thinking……….What would I like?!?! Hmmmm so I got googling and I came across some amazing gifts that would suit any caker, especially if they’re as cake mad as I am.

Here’s what I found……

  1. These are definitely my Number 1 gift. I absolutely adore shoes, what girl doesn’t. Being a cake decorator means I work most weekends, especially those late Friday and Saturday nights, icing cakes, decorating, screaming, crying, you’ll know what I’m taking about if you’re a caker, so to get to my point- I have lots of beautiful shoes THAT I NEVER GET TO WEAR, but, can you picture me decorating cakes in these babies? Yes, they are high heels decorated as icecream, don’t they just make you want to eat that cherry right off?  It would make it all seem so much more worthwhile if I had these. They are made by the fabulous and innovative guys at Shoe Bakery!!!! Check them out they have amazing stuff on there. Which brings me to my Number 2.ice-cream-heels
  2. And while we’re on their fabulous site, why not get a matching bag? I mean it would be rude not to don’t you think?!?!?!?!? This Limited Edition White Sprinkle Bowler Bag is totally fashionable, even for non-cakers. It’s a must have for me.

icecream-bag

3. And look what else I’ve found which is also matching…..Yes, its an Icecream Cone Phone Cover from the incredibly clever guys over on Iced Jems. How cute is this? Would I use this? Hell yeah, its totally awesome. It may not be the right time of year to sport this phone cover, but who cares? A girl can dream, or so they say!

icecreamphonecover

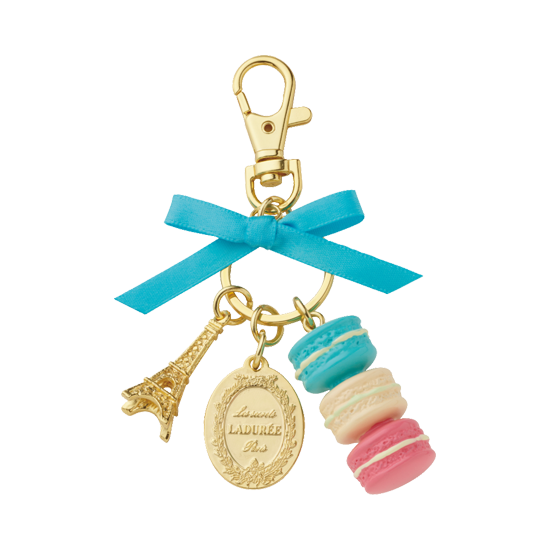
4. My next gift worthy of my top 5 are these super cute keyrings from Laduree. I completely and utterly love French Macarons, they come in such a vast range of flavours I love love love to make them. They can be quite tricky to make, of course, they tend to drive people to near insanity trying to perfect these temperamental little treats, but when you have them mastered, you will acquire a deep affection for them just as I have.  You can read my blog and tutorial on Macarons here.

macaron-keyring

5. And so this brings me to my last, but not least gift number 5….

I get such a thrill from trying new recipes, and one day would love to write my own Cake Book. This would be absolutely perfect for anyone who like me, loves to bake and try out new recipes and also come up with your own. So what better way than to keep record of them in this cute little recipe book, and who knows, maybe one day publish your very own!! It can be bought here from Paperchase online.

recipe-book

So there you have it. My top 5 gifts for a caker, baker, or basically anyone who swoons over sugar and spice and all things nice!! For my sister, husband, friends, if ever you get a burning desire to buy me a gift……be sure to check off my list first.

Jen ♥ xx


Meringue Kisses

Meringue-Girls-Dean-Street-flea-market-1024x1024

So I have been a huge fan of The Meringue Girls for quite some time now, and having mastered my French Macarons, you can read my tutorial blog here, I decided to give their signature desert a go!!

I googled their recipe and I was brought to Bakerella.com‘s website where I found the recipe and method for these little sweet beauties. In her blog post, she explains that she used The Meringue girls cookbook and that she found them very easy to make- I was chuffed to read this as I had been quite nervous about giving them a go for ages now.

So to get started, here’s exactly what you need:

Ingredients:

Equipment:

  • Hand Mixer and large mixing bowl (optional)
  • Food Mixer with whisk attachment
  • Baking tray
  • Non stick baking paper/parchment paper
  • Disposable piping bag
  • Scissors
  • Food safe paintbrush

Method:

  1. Line the baking tray with greaseproof paper and pour in the caster sugar. Bake for 3-5 minutes at 200C until the edges just begin to melt. In my oven its fan assisted so it only took 3 minutes for this to happen, so please note ovens do vary.
  2. In the meantime, pour the egg whites into a large mixing bowl and using your hand mixer with a whisk attachment, begin whisking on a low speed until bubbles begin to form. Of course, you may do this in your food mixer too using the whisk attachment. Then increasing to high speed gradually, continue to whisk the egg whites until stiff peaks form and you can turn the bowl upside down without the egg whites falling out. I talk about this in my blog on making French Macarons which is linked above.
  3. Take the sugar out of the oven and turn the oven temperature down to 100C. Then with the mixer still on high speed, begin to add one heaped tablespoon of the sugar at a time, making sure that the egg whites come back to stiff peaks after each tablespoon of sugar. When you have added all the sugar, continue to whisk for 5 – 7 minutes. The mixture will be ready when it has formed a high gloss and when rubbed between your finger tips it is completely smooth, with no “gritty” feeling of sugar.
  4. Prepare the baking tray again with fresh Parchment paper. To do this, use your finger tip and dab the meringue mixture on the four corners of the tray and press paper on top to hold it down in place. This prevents the parchment paper from moving whilst piping the meringues.
  5. To achieve the striped kisses, turn a piping bag inside out and paint on 4-5 stripes of your food coloring. Then roll the bag so the painted side is inside and carefully spoon the meringue mixture into the piping bag and fill it 2/3 of the way full. I find this makes it easier to manage the bag and to be more precise when piping the kisses. As you don’t need a piping tip, just cut off the tip of the piping bag about an inch in diameter to give good sized meringues.
  6. To pipe the kisses, hold the bag upright and allow the tip to touch the paper. Then squeezing the bag, pipe onto the sheet and pull upwards to get the little flick at the top. (my husband calls them gnome hats)
  7. Bake them in the centre of the oven at 100C for 30-40 minutes until they can easily be lifted off the parchment paper with the bases in tact. In my oven I used the regular setting ensuring not to use the fan. Allow them to cool completely and store them in an airtight container will keep for up to two weeks., or you may freeze them as they hold up really well in the freezer.

Here are my Meringue Kisses,

So happy that the #meringues worked out. Absolutely ❤️ these. Tried and tested using the @meringuegirls #recipe #jenscouturecakes #meringuelove #meringuekisses #meringuekisses #foodphoto #foodphotography #foodbloggers #foodblog #foodblogger #foodie #foodies #foodiegram #foodieblog #meringuegram #newproject #ideas #newproduct #desert #desertlove #desertlove
 meringue kisses
Its safe to say, I will be making these little sweet beauties a lot from now on, they went down a treat in my house and they’re definitely something I will be adding to my production list.
Let me know how you get on with yours and post your pics in the comments, I would love to see them!!
Have a great day,
Jen ♥ xx


JensCoutureCakes at The Gossies Awards…


gossies-utvy-620x434

Hey everyone, I hope you’re all having fab week! It’s been a busy one here at JensCoutureCakes HQ but we’re finally getting to sit down and show you all the fabulous display we put on for the Goss.ie Gossies Awards 2016. When Ali, the CEO and Managing Director of Goss.ie, got in touch with me to do the display I was thrilled. I absolutely love following Goss so it was an absolute pleasure to be a sponsor for the awards. Ali left the design and display completely up to me and advised me the colour scheme was pink and grey, with a Hollywood touch for the awards.

DSC_0008 (2)

For the cake, which was to be the main centrepiece, I decided to go with a marbled effect. I had been wanting to do it for some time and I decided now was the perfect timing- its classy, its elegant and when done right it can make any cake a showstopper!!! I also dressed it with pearls and diamonds, and a massive diamanté brooch on the side with a huge satin bow. I feel the diamonds and pearls added some Hollywood style, remembering the beautiful Marilyn Monroe and the fabulous Grace Kelly. What do you think of the marbled effect?

DSC_0055

DSC_0034

As it was a classy event, we also went with French macaroons and cupcakes to sweeten the Irish celebs. French macaroons are quite an elegant treat, not too big , not too small, just enough to enjoy something sweet. And what would the display be without some glitter? We sprinkled them with edible glitter to add a touch of glitz and glam for the Hollywood effect. They were loved by all who attended the awards. I have a tutorial on how to make these heavenly treats which you can read here.

DSC_0022DSC_0019

I also created some macaroons pops (as I don’t have a love for cake pops). And look at the fabulous macaroon wrappers that were so kindly given to me by the lovely Tatiana of Floribelle Ireland. Have a look at her fabulous page here. Tatiana makes laser cut and personalised sweet favour boxes which add an elegant touch to any event, especially weddings! Have a look at our macaroon pops below……….what do you think? Wouldn’t they be perfect for any event or occasion? From corporate events to baby showers, personalised gifts to wedding favours, these macaroon pops are sure to impress your guests.

DSC_0064DSC_0073

Tatiana also gave us some fabulous cupcake wrappers…..

DSC_0068

Aren’t they fab? I just love all things classy and elegant, and the detail in the cupcake wrappers are amazing….

And of course I added some sweets to the display including our meringue kisses, marshmallows and mints to finish off the cake and candy display.

DSC_0079

What do you all think of these massive lights from Lovin Letters ? Aren’t these just so cool…..having your name in lights……now that’s a thought 🙂 Absolute amazeballs.

DSC_0006

We also sponsored the Goss 1st Birthday Bash last year, and I created this fabulous cake display for them with some macaroons and mini cupcakes. Have a look below…..

11745414_1584008835179297_1904791548476939394_n11429972_1564717043775143_6018544515863865309_n

I was thrilled at the response from our display, Ali absolutely loved it and its safe to say that when we returned to take it down, the celebs had loved it too…. there wasn’t a crumb left 🙂 And to my absolute amazement, lots of the celebs shared the display on their snapchats, including FACES BY GRACE who won the award for Best Blogger, the gorgeous Marissa Carter of COCOA BROWN who won Best Girl Boss of The Year and the fabulous Joanne Larby of THE MAKEUP FAIRY even shared it onto her Instagram account!!! Yikes!!!

Here are some of the photos from Goss.ie Behind the scenes, pop over and have a look. Theres a snap of our display in here too.

To view the list of award winners, have a look here. and you can also watch The Gossies  Awards from UTV The Pulse here. I got to meet the lovely Jenny of Utv The Pulse, didn’t she do an amazing job?

If you were at the awards or have been following them on social media’s, pop by and say hello and let me know what you think or thought of our display….

Jen ♥ XX

Our top tips on choosing your Wedding Cake!

jens 2015 wedding cakes

If you are already looking at wedding cake designers, ideally by now its safe to presume you have your wedding venue booked and the dress ordered. With those two hugely important details arranged, I would recommend the cake to be next, and let me explain why…….

qwe

1) Deadline

Most cake decorators can be booked up for at least a year in advance, so it is best to give them as much notice as possible to book in your cake. They’re not like your typical grocery store, lots of cake designers provide beautiful, bespoke wedding cakes and their skills are so much sought after that they book up pretty quick. If you have your eye on a specific designer, and you love their typical cake designs then pre-book the date with them, and the details can follow suit. But be sure to BOOK YOUR DATE! Most cake decorators will do this with a small deposit to secure the date for you.

10624958_1439851192928396_5483717924148815440_n

2) Design

If you haven’t already, then now is the time to get researching cake designs. Like I said previously, if you have your eye on a specific designer, most of the time they will have a specific type of design they stick with- be it vintage or couture, and you will most likely want one of their typical designs. But if it is more of a bespoke cake you want, for example the cake above, then you need to research designers to make sure they can create the design for you. Have a look at their work to see the cakes they’ve made before.

pastelSamples (1)

3) Colour scheme/Theme

Once you have the date secured, if you don’t already have a chosen colour scheme and wedding theme then now is the time to hit Google and Pinterst hard!!! Google until your eyes are sore and cant bare to look at a computer screen no more, because your colour scheme and theme is very important. It is incorporated into every part of your big day, especially your cake (most of the time)and you want to make sure its just PERFECT! Bare in mind the time of year you’re getting married, for example if its spring/summer lots of brides go for the pastel colour range along with a vintage theme, in winter you can go for richer, deeper colours with a winter theme. But like I said, really research colours to make sure its exactly what you want……..those photos are here forever!! Once you have your colours and theme chosen, let your cake decorator know! This will help them begin to plan your cake, down to purchasing ribbon for the cake, coloured fondant or food colourings and any other coloured materials they will need for your bespoke cake along with creating the design and incorporating the theme. For example, if a pastel colour range with a vintage theme, the cake will more than likely have some hand made vintage roses/flowers with light and airy colours like pastel pinks, peaches, etc.


wedding cake tastings

4) Flavours

For wedding cakes, traditional is totally gone out the window! Fruit is no longer the typical cake for wedding cakes. For me here at JensCoutureCakes, the most popular is chocolate biscuit cake, followed by red velvet, and then Victoria sponge. I always ask brides and grooms what their favourite cake is and to go with that for their wedding cake, because it is their cake after all and what’s the point in having a full tier of fruit cake, for example, and it going to waste!

WeddingCakeServingChart

5) Size/Servings

For this, you really need to decide when you want to cut the cake. The newest tradition with weddings is a second day affair, and lot’s of brides choose to keep their cake until the following day. It’s quite a clever idea to be honest, as the wedding day itself is full of food for guests and most of the time the cake goes to waste. Usually, with the second day, your guest list will be cut in half, at least, and you need to decide first of all if this is what you want to do with your cake, and if so, do you only want cake for the guest numbers that will be there or do you want some cake to take home also. Don’t let this put you off the wow factor sized cake if that’s what you want, as you can have a cake that is made up of edible cake and non edible stryofoam cakes to give you added size to your cake.

And lastly…………….

dont be afraid to ask questions

6) Don’t be afraid to ask questions!!!!

You can ask as many questions as you like. We are always here to help, we have lots of ideas and your questions are never deemed stupid or silly. We love what we do, ad more importantly, we want you to love what we do, so always feel free to discuss your cake in depth to make choosing your wedding cake enjoyable and also to ensure you have chosen the right design for you!

If you have any questions you would like to ask us, feel free to get I’m touch via our facebook page JensCoutureCakes. You can also get in touch via the following social media links:

Instagram: https://twitter.com/JensCoutureCakes

Twitter: https://twitter.com/JensCoutureCake

Snapchat: jenscouturecake

or by email: JensCoutureCakes@hotmail.com

Also feel free to comment below. I hope you enjoyed the blog,

Jen ♥ xx


The Caketress!!!!!!!!

loris cakesFor those of you who call yourselves a true “caker”, you will know exactly who I am talking about, but for all my followers who don’t, Lori is known as The Caketress. Her name The Caketress comes from her background of fashion designing. She absolutely loves fashion and when things didn’t work out for her in the industry, she decided to create cakes reflecting the designs she wanted for clothes- Seamstress meets Cakes – The Caketress!!! Such a clever, inventive name for her and she has lived up to that name ever since.  With her love for the catwalk, Lori updates her designs to be on point with the latest fashion statements, keeping a close eye on designers such as Dolce & Gabbana, Valentino and Chanel to name a few. She can turn any dress design into a cake, adding specific detailing including sequins, studs and diamonds which she makes edible (how amazing is that?) and also feathers, ruffles and flowers!

Have a look at them below……………

lori dolce and gabanna

Dolce and Gabanna inspired cake by Lori Hutchinson

lori valentino

Valentino inspired cake by Lori Hutchinson

Look at those designs and the attention to detail, its absolutely mind blowing how she creates cakes that are perfect art, edible art, only how incredibly sinful would it be to cut them?!?!?!?!?!? I mean come on, if this cake was at the top of the table for my wedding, it would be treasured forever in a glass case and all my guests would of course be given slab cake to eat, who eats cake at weddings anyways?!?!?! Especially an Irish wedding, need I say anymore?

lori

Lori is currently worldwide teaching cake decorating classes and has been primarily based in Dubai,where their love for extravagant, extraordinary enormous cakes is ever growing. Her cakes have been going down a treat over there. Have a look at some of the cakes below!

Lori’s website, which you can go and swoon over here is filled with couture, classy, chic designs fit for a princess.  I fell in love with cakes designed by her when I first spotted that there was a class on in Decobake Bachelors Walk, Dublin a good while back-it may be a year or even 2 years ago. I fell in love with her cakes straight away but as her classes fill up in minutes, I wasn’t lucky enough to nab myself a spot on her class, so low and behold a few weeks ago it was advertised again that Lori was coming, but again spots filled up and I missed out.

lori decobake class

To my surprise, they announced another date- a one day class with The Caketress herself and I rang immediately to pay for a place to work alongside this amazing cake decorator. I was absolutely thrilled that I managed to get to meet Lori, never mind getting the opportunity to work with her and learn some of her incredible techniques and of course, her signature design- CAKE SEQUINS!!!!!! I will be doing a blog post on my experience with Lori in Decobake over the next few days, so be sure to keep your eyes peeled!!!!

Have any of you met The Caketress or been so lucky to work alongside her?

Let me know in the comments below!

Jen ♥ xx

An Artistic Expression or a Ghoulish Creation?!?!?!?!

jodie til death 3

by JensCoutureCakes

Spooktacular wedding cakes are becoming more and more popular over the last few wedding seasons and what more of a suitable topic to blog about than these, after all it’s almost Halloween. With cake decorators seeing more and more of these designs being requested by brides and grooms alike, I want to know would it be a design you would have for your special day?!?!?

jodie balfe cake

by JensCoutureCakes

I absolutely loved designing this cake for a recent bride and groom, as it was literally them in a cake version lol. They both love all things skulls, tattoos, each other (more importantly) and when they approached me to to create their wedding cake, we sat and discussed designs and ideas, but ultimately, the design was left for me to comprehend on their cake. Even up to the day before the wedding, myself and the bride discussed the layout and design, but it wasn’t until I actually started it, did it come to life. When they got in touch the day after the wedding to thank me for the cake, I knew I had slam dunked the design for them (phew…..it’s always a nervous time, not because I’m not confident in cakes that leave my cakery, but because people can tend to have an idea in their mind, but when it actually comes to life it can sometimes not be what they wanted afterall!)

Personally, I’m more of a vintage/classic kinda gal but I have warmed (a little) to these designs, and let me explain why. Skulls generally freak me out, I’m kind of screamish that way, but when given free reign to design them, I like to think of it as more of an artistic expression rather than a ghoulish creation. With Sugar Skulls increasingly being incorporated on cakes, whether it be birthday celebrations or wedding cakes, there is a pretty side to them, as the artist behind them really gets to enjoy free hand designing with food grade colours (c’mon what’s more cool to us decorators) knowing that when its done and dusted, it can be eaten and enjoyed just as much as the designing itself.

1620471_1474497682797080_7877506096964334841_n10846021_1474497622797086_871957268734917192_n10352321_1474497642797084_905018876781272604_n

by JensCoutureCakes

There is alot of history on Sugar Skulls, relating to All Hallowes Eve, All Soul’s Day, or Halloween as we call it. But for me, that’s not what they’re about on cakes. They are an expressive art where I can use any colours I wish, any designs and pretty much free hand it the whole design. Between swirly swirls and hand painted flowers, I love getting to free hand paint. For years, as a child, I would sit and hand draw all the Disney characters from Ariel to the Seven Dwarfs, and everyone in between, so getting to free hand draw is like being a child again lol.

11048728_1569960813250766_8567986183956577357_n

by JensCoutureCakes

So whether you’re into Sugar Skulls or not, embrace your inner personality and never be afraid to have it reflected on your cake, (birthday, wedding, etc.,) after all, a cake is to celebrate you and nobody else!!

What do you think about them?!?

Jen ♥ xx

French Macaroons….Swiss Meringue Style

11165328_1554475054799342_542330191385978930_n

Hi everyone, I hope you’re all having a great week so far…….

As today is Wednesday (obviously lol) it is one of my busiest days of the week. I supply cakes to two very well established cafes in Dublin, one of which has many branches across Dublin which I supply to also, and one of their must haves from us here at JensCoutureCakes are my macaroons. They sell exceptionally well and thankfully they’re one of many favourites that I bake.

10982794_1599404330306414_4843127884605373595_n

So let’s get straight to it………French macaroons!?!?!?!?!?!?! What baking genius actually came up with these tough little buggars and where do they origin from? Well, I think their name gives the latter away, but let’s explore the first question- WHO came up with these beautiful, delicate, scrumptious little treats? Anyone know the answer? If you do, you are very inquisitive indeed, as most bakers like myself simply follow recipes and don’t look that far down the gene pool to see who created the recipes they follow. But for me, as I had such a Love/Hate relationship with them for so long, I was actually that annoyed one evening at the result of many batches after batches failing, that I felt the absolute NEED to find this out for myself. I’m not gonna lie, at that moment in time I fantasised about hurting this person because of the sheer mental and physical stress they (macarons) had inflicted on me.

So low and behold, like many of us earth creatures, I decided sure what the heck? Google is the way forward and the only method I need. As I typed, I entered into the Pandora’s box (a.k.a. the search bar) WHO INVENTED FRENCH MACARONS. And yes, I typed it in all capslock as I was so annoyed. Straight away, I went to Wikipedia as they know absolutely everything and they have to be right, right? Well according to them, Macarons, or Macaroons as most people pronounce them, were first created in the 8th century in Venetian monasteries, and then during the Renaissance Catherine de’ Medici (if ever I wanted to change my name, its now! From now on my new name is Jennifer de’ Medici- it screams sophistication doesn’t it?). She brought them with her to France in 1533 via her pastry chefs when she married Henry II of France. In 1792, two Carmelite nuns seeking asylum in Nancy during the French Revolution baked them and used the money they made to pay for their housing. If only they made me that much money nowadays I would be up to my ears in them!! But however, it was only in the 1830’s that the idea of sandwiching these beauties together with a scrumptious filling inside came to light, when they were originally called “Gerbet” or the “Paris Macaron”. Pierre Desfontaines, of the French patisserie Lauduree, has been known to have created it along with another baker, Claude Gerbet. So to my distaste, there was absolutely no way I could punish these people for creating these complicated creations, however, little did I know that later in the future I would wish to have been alive back then to meet these sweet geniuses and thank them for creating such a mouth watering confection, that melt on your tongue and literally create an addiction you will never satisfy!

11745414_1584008835179297_1904791548476939394_n

French macarons, when made right, can literally be the show stopper at any party or event. They can be coloured almost any colour and filled with any filling of your choice, the most popular being dark ganache’s, buttercreams or jams. When colouring my macarons, I will only ever use Progel Food Colours from Rainbow Dust. They have 37 Progel colours, and I have tried most of them, if not all. As one of my clients have Lime Green as their company brand colour, this is by far one of the more popular colours for me but, the red, pink, orange, etc are amazing too. The colours are so vivid, and the beauty with this range is you literally only need a small amount, especially to get a pastel colour range. If you want a deeper colour, obviously you need to use more as the colours do tend to fade when the macarons are baking in the oven, but as the saying goes a little can go a long way. Also, the gel consistency is perfect as it doesn’t affect the macarons one bit. Liquid food colours have a tendency to affect the consistency a lot more making the macarons more difficult to make.  When I’m asked, or when I see others having trouble with other food colours, this is the one I recommend and only recommend. And just to be clear, I am not and have not been linked with Rainbow Dust, so I am not pushing this product on you in no way, shape, or form, it is just the only fact that I have found this range to be the best one to use for my own personal use. I have tried so many others and have never had the results I’ve wanted, but other bakers may have different preferences, but for me, this is my go to brand for any food colouring, whether it be macarons, buttercream or fondant.

Here is a pic of their colour range I took from their site. Isn’t it so pretty???? Its like a rainbow! Now it makes sense where they got the name Rainbow Dust for their company name, lol.

0004826

OK, so lets get down to the nitty gritty’s. My JensCoutureCakes foolproof method for making and creating beautiful French Macarons! This recipe will make approx. 30-40 macarons, depending on how big you pipe your them.

For the Macarons, you will need

Ingredients:

300g Ground Almonds (also known as almond flour or almond meal)

300g Icing sugar (also known as confectioners sugar)

125g egg whites (at room temp)

300g Caster sugar (fine white sugar)

100g egg whites (for the meringue)

food colouring of your choice (here I have used Progel Lime Green)

Equipment:

Weighing scales

Large mixing bowl

Sieve (optional)

4-5 Baking trays

Greaseproof paper (parchment paper)

Spatula

Electric hand blender

Thermometer (ikea have great ones)

Piping bags

Large round decorating nozzle

Bain Marie (basically its a pot of water with a metal bowl sitting on top)

It is important to have your egg whites at room temperature. Many people swear by egg whites that have been separated and stored for a few days but I have never tried that. I have always just taken my eggs from the fridge a couple of hours before I need them to bring them to room temp.

Now that we have the ingredients, lets get down to the step by step!

Method:

  1. Preheat your oven to 150°C. In a large mixing bowl, blend together the ground almonds and the icing sugar until they’re well combined. You may use a sieve for this but I prefer to use my hands to do this. My great aunt showed me a trick they used to use in convents with the nuns. To do this, dig your hand to the bottom of the bowl and have your fingers on both hands touching each other at the tips.Bring up the almonds and icing sugar upwards above the rest of the mix and allow it to sieve through your fingers (I hope this makes sense?!?) basically use your hands as the sieve and let the flour/icing sugar fall between your fingers allowing it to fall into the bowl. This helps to create air and is a perfect method for making a classic Victoria Sponge Cake- I wlll do a post on this method very soon! On the other hand, Just use the sieve to combine both ingredients together.
  2. When you have it evenly combined, push the mixture to one side in the bowl using your hand and leave a deep well to the opposite side. This is for egg whites! Scared yet?
  3. Pour in the first batch of egg whites weighing at 125g into the well.
  4. This is the part for the food colouring. Depending on how deep you want the colour to be, squeeze in or add in drops of the food colouring. Using a tooth pick or skewer, mix the food colouring into the egg whites until fully combined but be careful not to “whisk” it, do it slowly and gently. Put the bowl to one side.
  5. Using your Bain Marie (put a pot of water under your stainless steel mixing bowl) and put it onto the cooker on a low heat. We are going to use the steam from the water in the pot to “cook” the swiss meringue.
  6. Place your second batch of egg whites (100g) into the bowl, and using your electric hand mixer, whisk away on a low speed. When you see the egg whites turning frothy, now is the time to start adding your caster sugar. Add it in, very slowly making sure that each time you add it you mix it well before adding some more.
  7. This is where it gets a little tricky and I’ve often wished I had an extra limb to help me…… At this point, you need to use your thermometer. To do this, hold the thermometer in one hand stuck into the meringue mixture. Make sure it isn’t touching the bowl as the metal will be hotter than the actual meringue. And in the other hand keep the blender going on a low speed for approximately 5-8mins.
  8. You will be looking out for a thick glossy mixture and you want it to reach 50°C. As soon as it does, take the thermometer out and take the bowl off the heat straight away and place to one side. Please be careful doing this as it is quite tricky holding everything in your two hands and remember to turn off the cooker!!
  9. Then using a spatula, empty out the meringue mixture into your large mixing bowl with the ground almonds,etc.
  10. With the spatula, using it clockwise, mix the mixture together. This will of course take a good few turns, approximately 20 but be sure not to over mix. As soon as the food colouring is completey combined, now is the time to stop!
  11. Grab your piping bag, and snip the top of it off if you’re using a disposable one. If not, use a regular piping bag with a large round decorating nozzle, and fill your piping bag. The easiest way I find to do this is to use a tall glass/tumbler and put your piping bag into it. Then fold down the bag around the glass, almost like youre turning it inside out over the glass and use your spatula to place the mixture into it. This will take a few times especially if your piping bag is small but in my opinion you have better control over a smaller amount of mixture so the smaller the bag the better.
  12. Cut and measure your greaseproof paper to the size of your baking trays and then, use a tiny amount of the macaron mixture on each corner of the trays to secure the greaseproof paper to the tray. This prevents it from moving around.
  13. Now using your filled piping bag, squeeze out a small amount of the mixture onto the lined trays, but don’t have the nozzle touching the lined tray keep it about 2-3mm up away from the tray. To pipe, apply pressure to the piping bag and just as you can see the size of the macaron you want, release the pressure and using a circular motion, pull the bag to one side to ensure you don’t get a “peak” on your macaron. If you have a peak , dip the tip of your finger (anyine will do) into warm water and ever so gently place your finger onto the raised area and gently push it down. Be extremely gentle here and dont have your finger dripping with water literally just have the tip of your finger damp. When all your macarons are piped, bang each tray at least 3 times pretty hard off the counter. This pops out any air from the mixture and then place them to one side to set for about 30 minutes or until a film has formed on the tops of the macarons. The time may vary depending on humidity, so usually if its quite warm in your area, the film will form a lot earlier than this. To test for this, again ever so gently touch the top of the macaron and if its not sticky and none of the mixture leaves a residue on your finger then they’re ready to go into the oven. The reason we do this is because this film traps all the air inside the macaron only allowing air to escape out of the bottom of them and this is where the “foot” of the macaron is formed and the macaron is forced to raise upwards giving it it’s height (such an amazing process really!!).
  14. When ready, place the trays in the oven. Personally, because my oven is ever so temperamental, I only ever bake one tray at a time on the top slot in my oven, and I bake them from 8-12 minutes. Let me explain why. Sometimes when mixing the meringue into the ground almonds and we over-mix it ever so slightly, the mixture becomes “wet” and therefore more of a runnier mixture and can take longer to bake in the oven. However, when I know myself how much ive mixed it I can then decide myself how long to bake them for. This is something you can only gain through experience with baking macarons. So for you guys, whether first timers or not the easiest way for you to know when your macaron is baked is to check them after 8mins and using your spatula, see if you can slide it in underneath one of the macarons and lift it from the greaseproof paper. If it lifts, its ready. If not, leave for another 2 minutes and try again. But again, personally, after at least 10 minutes I already know that my macarons are baked and can be removed from the oven and initially they may not lift off the paper but once theyre out from the oven and let cool for a few moments, they lift off easily and perfectly.
  15. Allow them to cool. Approx 5mins. Then to sandwich them together, use a tiny amount of the filling of your choice and stick one of the macarons to another one the same size and voila……………you have some French Macarons,
  16. Next………………………….USING THE TIPS OF YOUR FINGERS, PICK ONE UP, OPEN YOUR MOUTH AND PUT ONE IN…..LOL WELCOME TO FRENCH MACARON HEAVEN!!!!!
Here is a picollage of photos I took specifically to show you the steps. I hope this helps.
12063708_1606711109575736_7309583987990539390_n 12074713_1606711399575707_667599490033572691_n
I really hope this blog posts gives you some insight into the macaron world and I would love to know how you got on with your macarons after this blog post. If you have any questions at all, please feel free to comment below or email me, I would be more than happy to help as I once lived in macron hell and know exactly how frustrating they can be.
Looking forward to hearing about and seeing your beautiful creations,
Jen ♥ xx