
So I have been a huge fan of The Meringue Girls for quite some time now, and having mastered my French Macarons, you can read my tutorial blog here, I decided to give their signature desert a go!!
I googled their recipe and I was brought to Bakerella.com‘s website where I found the recipe and method for these little sweet beauties. In her blog post, she explains that she used The Meringue girls cookbook and that she found them very easy to make- I was chuffed to read this as I had been quite nervous about giving them a go for ages now.
So to get started, here’s exactly what you need:
Ingredients:
- 300g Caster sugar
- 150g Egg whites
- Food Colouring (my fav Rainbow dust Progel)
Equipment:
- Hand Mixer and large mixing bowl (optional)
- Food Mixer with whisk attachment
- Baking tray
- Non stick baking paper/parchment paper
- Disposable piping bag
- Scissors
- Food safe paintbrush
Method:
- Line the baking tray with greaseproof paper and pour in the caster sugar. Bake for 3-5 minutes at 200C until the edges just begin to melt. In my oven its fan assisted so it only took 3 minutes for this to happen, so please note ovens do vary.
- In the meantime, pour the egg whites into a large mixing bowl and using your hand mixer with a whisk attachment, begin whisking on a low speed until bubbles begin to form. Of course, you may do this in your food mixer too using the whisk attachment. Then increasing to high speed gradually, continue to whisk the egg whites until stiff peaks form and you can turn the bowl upside down without the egg whites falling out. I talk about this in my blog on making French Macarons which is linked above.
- Take the sugar out of the oven and turn the oven temperature down to 100C. Then with the mixer still on high speed, begin to add one heaped tablespoon of the sugar at a time, making sure that the egg whites come back to stiff peaks after each tablespoon of sugar. When you have added all the sugar, continue to whisk for 5 – 7 minutes. The mixture will be ready when it has formed a high gloss and when rubbed between your finger tips it is completely smooth, with no “gritty” feeling of sugar.
- Prepare the baking tray again with fresh Parchment paper. To do this, use your finger tip and dab the meringue mixture on the four corners of the tray and press paper on top to hold it down in place. This prevents the parchment paper from moving whilst piping the meringues.
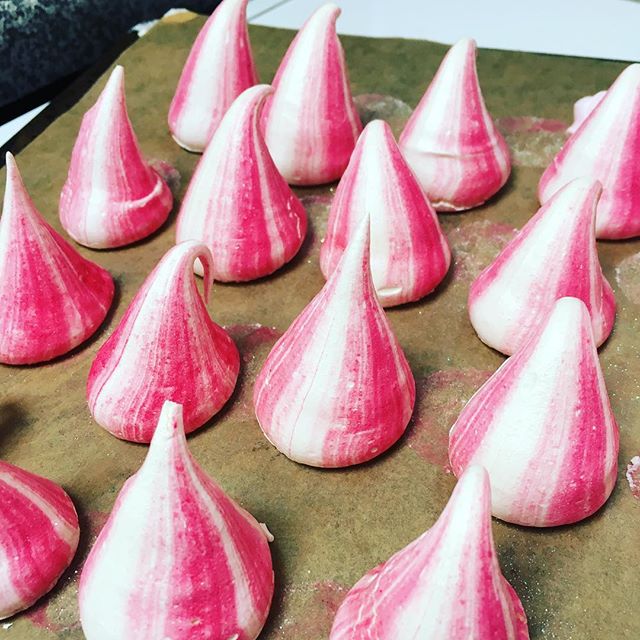
- To achieve the striped kisses, turn a piping bag inside out and paint on 4-5 stripes of your food coloring. Then roll the bag so the painted side is inside and carefully spoon the meringue mixture into the piping bag and fill it 2/3 of the way full. I find this makes it easier to manage the bag and to be more precise when piping the kisses. As you don’t need a piping tip, just cut off the tip of the piping bag about an inch in diameter to give good sized meringues.
- To pipe the kisses, hold the bag upright and allow the tip to touch the paper. Then squeezing the bag, pipe onto the sheet and pull upwards to get the little flick at the top. (my husband calls them gnome hats)
- Bake them in the centre of the oven at 100C for 30-40 minutes until they can easily be lifted off the parchment paper with the bases in tact. In my oven I used the regular setting ensuring not to use the fan. Allow them to cool completely and store them in an airtight container will keep for up to two weeks., or you may freeze them as they hold up really well in the freezer.
Here are my Meringue Kisses,

Its safe to say, I will be making these little sweet beauties a lot from now on, they went down a treat in my house and they’re definitely something I will be adding to my production list.
Let me know how you get on with yours and post your pics in the comments, I would love to see them!!
Have a great day,
Jen ♥ xx
